"Properly practiced, knitting soothes the troubled spirit, and it doesn't hurt the untroubled spirit either." ~ Elizabeth Zimmerman
Showing posts with label tutorial. Show all posts

12/30/22

Chain Row Counters

 Here is some more Christmas present creations. I made some Chain Row Counters for knitting friends. I ran across this idea on Amazon.com a couple years ago. I decided I wanted to make some this year so I ordered some number beads, and 10mm silver closed rings. I used beads and wire in my stash. Here are the first four. (These pics suck so bad, My apologies.)


I didn't make them fancy because it was the first time. It was not easy for me either. I'm not so good at making loops in wire.


I made 2 markers for each chain (hanging on the last loop). As you can see, the above one has purple beads. One is a pressed glass flower and the other is a carved amethyst bead. The numbers are white glass.

This next one has deep ruby 4mm fire polish crystals.


This one has two pressed glass beads. One is a light green flower, and the other is a green twisted oval.


The fourth one features blue pressed glass flowers.


It took me several hours to make them. I went through quite a few silver t-pins just trying to get decent wire loops made. 

After I was done, I made some Printable Boxes to put them in. This is a little hobby I had several years ago and kind of forgot about it after awhile. There are templates both free and for purchase all over the internet. You print them out on 8.5 by 11 inch cardboard with your printer, cut them out, fold in the proper places, and glue or tape together. Now you have a tiny box perfect for a small gift. Here are the boxes I made. If you find this intriguing, google Printable Boxes.


The day after I got these done, someone in the Facebook beading group mentioned a tool called Wire Loop Pliers. I'd never hear of them. Intrigued, I googled. Wish I'd known about it sooner. especially two days sooner. Sigh. 😑


I knew I was going to be making two more chain counters, so I ordered the pliers right away. It arrived a couple days later. Oh. My. God! What a wonderous device.


It makes absolutely perfect loops every time, and cuts the excess wire off to boot! I sat down and whipped out another chain in 15 minutes! So much easier! I made this one for daughter Ruth to stuff in her stocking.


You may notice it's a little fancier. The numbers are silver. I put 4mm Picasso druks in sage green/brown either side of the numbers to dress it up a bit. I used 4 and 6 mm Picasso sage green/brown faceted beads on the markers along with a couple bicone Swarovski crystals. A person could get mighty creative making these.

If you want to know how to make the basic ones like the first four chains, see this tutorial:

DIY Knit Row Counter

If you want to know how the row counter works, watch this:


Live long and prosper. \\//


11/12/19

Loose Neckband

Just thought I'd share something interesting I did this week concerning making the neckband on Milo.

It's a typical crew neck. It's important to me that these kinds of bands look great, so I apply something I learned from machine knitting. (Note: I have done a lot of machine knitting. I own 4 different knitting machines. I stopped using them when I had back surgery several years ago. I need to get back into it cuz it's a lot of fun.)

I started out with the recommended size 6 needles to pick up the stitches. I knit about half of the band, then I changed to size 5 needles and knit about 1/4th of the band. I changed to size 4 needles for the last 1/4th and the bind off. This technique will make a neckband lay down so nicely, usually.

I wanted to use a stretchy bind off so the band would go over the head easily. I didn't think a standard bind off with size 4 needles would be a good choice so I went online and found one to try called the Elastic Bind Off. It's very easy to do and it is very stretchy, but the edge was left looking rather waffly and stretched out looking. It didn't pull in and lay flat like it should. It was the same problem I had with the cuff bind off. I was not happy with the resulting look. So I applied the same solution which I can show you here cuz I took pictures.

I took a piece of contrasting yarn and threaded it through the edge. I went under the knit stitches and over the purls.


Then I pulled it together so the knits pleated over the purls. I tied a little bow to keep things in place.


I gently steamed it, let it dry, then removed the threaded yarn.


It lays perfectly now, and stretches nicely. It springs right back too. It's permanent because it's acrylic. Steaming does that to acrylic.


If this had been wool I am not sure doing this would have worked. I probably would have taken the bind off out and done something else. Probably the EZ Sewn Bind Off because I know it looks nice in this situation. Or maybe I'd have looked for something else.

I learned something important from this. The Elastic Bind Off is not suitable for a ribbed edge. It would be great, though, for lace or any pattern that doesn't pull in like ribbing does.

I hope this was helpful to someone.

Live long and prosper. \\//

6/30/15

Adding A Button Hole After The Fact

I love it when I learn something new in my knitting. Last week I did and I'm passing that knowledge on to you.

Every once in awhile the fearless leader of our KnitWits group will bring me an unfinished project someone donated for me to take care of. I can either finish them, or unravel them so the yarn can be used for something else. Most of the time I unravel because either there's no pattern to tell me how to finish the thing, there isn't enough yarn (if any), or there's just not enough of the project done to make it worth it finishing it. But once in awhile one comes along that I do finish.

The last project she gave me was a baby sweater. It was done except it needed buttons sewn on (which were donated with the sweater) and button holes. The knitter had forgotten to put the button holes in as she knitted the sweater. (I suspect that's why it was donated.) I did a bit of research and discovered it IS possible to add them in after the fact. I started out with the instructions I'd found on the web (my Google Fu is strong), but as I was working the first button hole, I came up with an even better way to do it. That is what this post is about.

I started working on this project at Rathdrum Knitalong on Tuesday. I did 4 of the 5 holes, then decided to take pics of the last hole so I could do this tutorial. You'll notice a change in background. That's cuz half way through the meeting ended and I went home and finished it. I used my phone to take the pics. I have not given the camera in my phone enough respect. It did much better than expected. Anyway, on to the tutorial.

1. The first thing you want to do is determine where you want the button holes to be. On this particular project, I wanted button holes along the front band so I put safety pins at each knitted row where I wanted the holes.

2. After determining the row for button hole placement, take a sharp pair of scissors and clip the yarn in the middle of that row. This band was 6 stitches wide, so I clipped the 3rd stitch.


You will have a hole like this with two little yarn ends.


3. Carefully and gently unravel the stitches in the row you just clipped until you have the number you need for the size buttons you're using. I had really big buttons, so I unraveled 5. I used a tapestry needle to coax the yarn strands out of the stitches. There will be stitch loops above and below.


4. Now you need 2 circular needles the same size that would probably give you the approximate gauge the garment was knit at for the next step. Double pointed ones would work just as good if you have them (I don't). I used two size 3's. Gently put the open stitches on the knitting needles. Put the ones above the hole on one needle, and the ones below the hole on another.


5. Push the two strands of yarn that are now on each side of the hole to the back. You can see mine here through the rather large hole.


6. Starting with the stitches on the needle at the bottom of the hole, you will bind the stitches off as follows:

Step 1-  Slip the first 2 stitches to the right needle.


Step 2-  Then, with the left needle, pick up the first of the two slipped stitches,


lift it up and over the second stitch and off the needle. The arrow in this photo is pointing at the stitch that is now off the needle and wrapped around the base of the second stitch.


Step 3-  Slip the next stitch from the left to the right needle and repeat step 2.


Repeat steps 2 and 3 until you have one stitch left on the right hand needle, then turn your work around so the needle with the stitches at the top of the hole is now in front and on the bottom of the hole. Continue to bind off across until you have one stitch left.

7. Now we finish it off so it won't unravel. Pull the closest yarn strand on the back to your open stitch through to the front. I got lucky. It was the longest of the two.


Using a tapestry needle, thread the yarn end onto the needle


and draw it through the open stitch.


Pull the strand back through the button hole to the wrong side and weave in the two ends. Here is the finished button hole.


And another one, which I did a much better finishing job on.


And here's the finished front of the sweater with buttons sewed on. (I really need to steam this thing.)


I hope you have enjoyed this tutorial.

Live long and prosper. \\//

4/21/15

Blocking Mittens

I am often asked how I block mittens. Here's a tutorial.

I am blocking a pair of mens mittens. They are made of 100% Acrylic, but I block everything with steam, including wool.

First, I have made myself a little cardboard blocker.I talked sweet hubby into letting me use his hand to create the blocker. I drew around his hand on the cardboard, then cut it out at the dimensions I wanted the mittens to be.


I insert the blocker inside the mitten. Please notice I've bent the thumb where it joins the hand. This is to make it easier to insert in the mitten. When the thumb part is in far enough, I unbend it and push it into the thumb of the mitten.


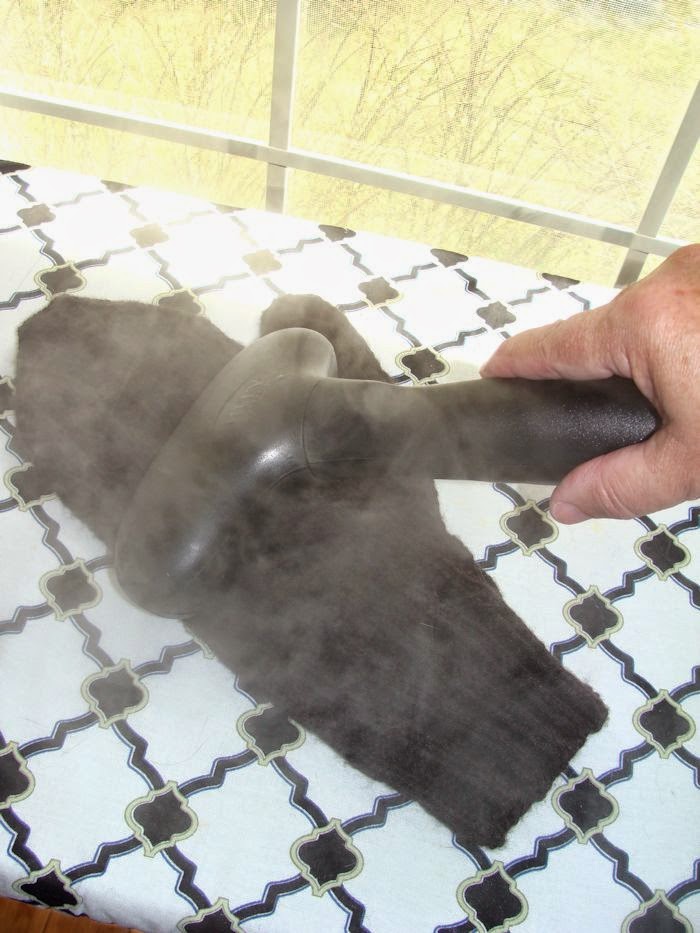
While doing this, I've warmed up my trusty Jiffy steamer. I then gently steam the mitten on both sides. If you don't have a steamer, a steam iron can be used. Just make sure you DON'T TOUCH THE FABRIC with the iron. Hover above just an inch or two.


Then I remove the blocker and steam again. On these mittens, the thumb is actually slightly more toward the palm, so I go ahead and fold it over and lightly steam it.


Sometimes, despite my best efforts, when I bind off the tips of the mittens, they will have little bumps or dog ears. I use the steamer to flatten them down so the top is nice and round.


I let them dry, which usually only takes a few minutes, and then they're done.


I hope this has been helpful.

Live long and prosper. \\//

3/26/15

Blocking a Knit Hat

Frequently I receive emails from folks asking me how I block hats. Well, here's the answer.

First I put a towel on my ironing board. Then I put the hat over a form and steam the top.


Here's my form-a stainless steel mixing bowl.


Sweet Hubby and I were given a set of these as a wedding gift yea these many moons ago. There are three different sizes. The largest one just happens to have the perfect circumference for blocking adult size hats-22 inches. The medium sized one is great for children and baby hats.

After steaming, the top looks pretty good.


To block the bottom half, I lay it flat and steam it like this. I make sure I don't put creases on the sides, and rotate it around.


I typically push and pat here and there with my fingers to get what I want. In this case, I was working on straightening the Latvian braids and making sure the fairisle section was the same height all the way around. I don't usually steam the ribbing because it will destroy the elasticity, though I will do just about anything to stretch it out so I can get the middle of the hat blocked properly. Usually I put a piece of cardboard the proper width just inside the hat. But in this case I didn't need to do that because the ribbing was wide enough already. I steamed the corrugated ribbing to even it out a bit. It doesn't have the same elasticity that regular ribbing does, so I didn't worry about it.

One other thing I did on this hat is block the tassel. It was pretty kinked.


I laid it out on the towel and carefully steamed it straight. I used a metal tapestry needle to 'comb' it out as I steamed.


That's all there is to it. It's not difficult.


Live long and prosper. \\//

12/24/13

Nightmare

I had a rather frightening experience last week that I've been wanting to write about. Today is the day. First, let me say that Chocolate Cephalopod arrived at it's destination safe and sound on Saturday. I convinced the receiver  to open his package early because, well, I just couldn't wait any longer to KNOW. I had to know, you know? As it turned out, I installed Skype, and my daughter set her computer up so I could watch Frank unwrap his present. It was very exciting. He was thrilled! He loves the octopuses on it. Sarah sent me a picture after he put it on. It fits him wonderfully well.


I am pleased, and relieved, and happy! But three days before I was living a nightmare.

On Wednesday I decided to wash Chocolate Cephalopod because, after being worked on for a year, it was rather dirty in places. The yarn used to make this is labeled as Super-wash Merino and machine washable. So, I washed it in cool water in my machine on the very gentle hand wash cycle. It looked fine when I took it out.

Then I put it in the dryer on the Knits/low setting. When it was dry I opened the dryer and pulled it out and promptly had a heart attack! The sweater had pilled. I mean REALLY pilled. It was just COVERED in them. I've never seen anything like it in my life! And I've seen some really crappy yarn in my lifetime. Not only that, but there was a hole in one of the sleeves! WTF!!! I actually started to cry. In fact, I almost got hysterical! So much time and work, and love went into that sweater (not to mention the money spent on the yarn!) and it looked just horrible! Here is a pic to show you. The whole thing was covered in these fuzzy bits.


After my husband got me calmed down so I could think straight (a shot of whiskey was involved), I went about fixing it. First I repaired the hole in the sleeve. I don't know what caused it. We're speculating that maybe there's something sharp in the dryer that it caught on. I need to go over the inside with my hands and see if such is the case. Anyway, I got the hole repaired so you can't even see where it was from the outside. Repairing holes in knits is something I've become quite skilled at over the years.

What are pills on sweaters? They are little balls of fuzz where loose bits of the yarn have felted a bit. Most sweaters pill somewhat when worn. Especially under the arms because the arms rub on our sides a bit. Heat plus friction equals felting. But Superwash wool is not supposed to do that, especially when washed. It's been specially treated to prevent it.

The solution to getting rid of pills is to gently shave them off with a disposable razor, like this.


Some folks use a tool specifically designed to shave pills off of sweaters, for example, this one.


I don't have one. I can count on 3 fingers the number of times I've needed to remove pills, including this time. So I had to use the razor. Not a big deal, but time consuming.

Every so often I stop and wipe away the fuzz with a lint brush.


It took me 2 hours of repeating those two steps to get the entire sweater, inside and out, looking like it is supposed to. This is what it looked like when I finished.


Quite the difference! This is the pile of fuzz I removed from the sweater. It's about 5 inches tall.


My daughter remarked that the pile was big enough a person could spin it into yarn and make a whole 'nuther sleeve with it.

I don't think anyone but another knitter can understand how devastating this experience is for me. I spent a great deal of money on what was supposed to be a high quality yarn from a reputable company because I know that if a person is going to put that kind of work into making something, it should be done with materials that will make it an heirloom. I chose that particular yarn specifically because it was supposed to be machine washable. Now the sweater will have to be very gently hand washed and laid flat to dry. It probably won't wear very well. I suspect I will need to repair more holes in the future. It saddens me. Really.

However, I am thankful that I had the knowledge and skill to fix the sweater so it is wearable, and even beautiful. And I am especially thankful that Frank loves the sweater because I love Frank very much. He is the best son-in-law a person could ask for.

Live long and prosper. \\//

3/13/09

You CAN Block Acrylic, You Should Block Acrylic

I am a reader of Anne Hansens blog, Knitspot. She does the most awesome lace shawl patterns in the universe. She has just released her new Maplewing shawl pattern. It's absolutely the most stunningly gorgeous pattern she has come up with yet! Unfortunately, I had problems downloading the pattern after I purchased it. I've run out of downloads (you get 3) trying to download it and still don't have my pattern. After having a right good panic attack for about 45 minutes, and emailing her shouts of help, I need to settle down. Anne has excellent customer service so I'm sure the problem will be resolved. I just need to be patient and wait until she can help.

Take large cleansing breath here.


Okay. I'm feeling a little better now. On to todays topic.

Being a member of Ravelry, I get to read all kinds of wonderful information on the subject of knitting, crochet, spinning, etc. It's a veritable fountain of all things knitterly. However, there is one thing that pops up in the forums every so often that just makes my blood boil. The myth that Acrylic can not be blocked. I've found the hand knitting community seems to believe this to be true. Even the celebrity designers and whatnot.

Wrong-in epic proportions!

Acrylic CAN be blocked. Let me repeat that.

Acrylic CAN be blocked!

In fact, it should be blocked. From my observations, I would say someone along the line made an acrylic sweater, blanket, or whatnot, blocked it in their usual 'wet blocking' manner and it didn't work. Therefore, acrylic doesn't block-warn everybody. No, it can be blocked. You're just doing it wrong.

I'm gonna tell you how to do it right.

First of all, as I said above, acrylic projects need to be blocked. It gives the yarn it's final finish. In other words, the yarn itself will look much better if it's blocked. We all know how sad an unblocked acrylic garment looks. All wrinkly, uneven, and kind of like it has morning bed head. I sometimes think acrylic gets it's bad reputation amongst the wool lovers because of this very situation. (Never mind they didn't block it right to begin with.)

Acrylic is basically a form of plastic. It requires steam blocking. It's the way it's done in the professional garment industry. It's the way we should be doing it.

It's quite easy to do. You pin your pieces out on your blocking board to the measurements required, making sure the straight edges are straight and even, and the curves are curved properly. If your gauge is just a little bit off so the piece is a little too small, you can stretch it out to where it's supposed to be. The change will be permanent once the blocking is complete.

I use blocking wires for this purpose. I love my blocking wires. In fact, I consider blocking wires the best way to pin a garment out for blocking. Takes way less pins, you don't end up with those scalloped wavy edges, and it's much more accurate for blocking to schematic measurements. Make sure, if you get some, to get a set that has the thin flexible wires for doing curves as well as the regular straight ones. Curves need blocking too.

For the most part, I usually pin things wrong side up. However, if the fabric has a deeply textured pattern in it, like cables and twisted stitches I will pin it right side up to prevent the texture from being flattened.

After pinning it out, you steam it, gently. I own a Jiffy Steamer for the purpose because knitting is my obsession. However, a good steam iron works just fine. Make sure you hover over the garment. Do not touch the fabric with the iron or it will melt. Do not over steam it either or you'll kill it. While steaming I will gently pat the fabric with my fingers to smooth it out. That's pat, not slide. Sliding your hand over it will cause it to stretch where it shouldn't. If there are cables, I'll pinch them a bit so they stand out a little bit more.

Killing is another one of those misunderstood issues. Killing acrylic means to overheat it to the point that it loses it's elasticity. Just steaming it a bit won't kill acrylic.

Sometimes a person wants to kill it on purpose, in which case, kill away. Killed acrylic has a wonderful silky drape that is quite pleasant, and unique. I have on occasion killed some acrylic on purpose for just this reason. Makes wonderful pleated skirts this way.

Here are some comparison photos of the baby cardigan I'm currently making. Please click on them to get enlarged versions.

Not blocked

A little wrinkly, the stitches are uneven, the ruffle wants to curl in an unattractive way, the button band curves and the edges inside the button band are puckered.

close up


Blocked


The fabric is smoother, the button band is straight, the inside edges don't pucker, and the ruffle lays as it should.

Close up of same corner as above.


Now, lets see side by side views.


Close up
Which one would you rather be seen in? (Assuming you're the same size as a 6 month old baby of course) I don't want to hear any more "Acrylic can't be blocked". Okay?

By the way, I steam block almost everything. Wool responds beautifully to steam blocking. I prefer it to wet blocking. If the professional garment industry can steam block, so can we.

Have a great day.

~~~~~~~

3/23/2011 Update

I am constantly being asked if steam blocking acrylic is permanent, or will it have to be reblocked after washing? The answer is it's permanent. So feel free to toss that gorgeous acrylic garment in the washer and dryer.

4/27/2022 Update: